Anatomy of a sketch
Every sketch has two functions - setup and draw. These are the starting points for all sketches, and for now, everything you write will be contained inside them. The function setup is called once, when your sketch is first run. It’s a place for you to set up some things about your sketch that won’t change. Here’s an example:
void setup()
{
	// set the canvas size
	// size( width, height );
	size( 300, 300 );

	// limit the number of frames per second
	frameRate( 30 );
}
The most important thing to do in setup is to let processing know how big you want your sketch to be - or in other words, how big the canvas on which you draw should be. The second function draw is called repeatedly, forever (as long as your sketch is running). This function is where you’ll do most (if not all) of your drawing. Here’s an example:
void draw()
{
	// set the background color
	// background( gray value 0-255 );
	background( 255 );

	// draw a circle
	// ellipse( center-x, center-y, width, height );
	ellipse( 150, 150, 100, 100 );
}
Note that there’s some funny syntax in there. It’s all important, but pretty simple once you know what it’s for. The first funny bit is the the beginning of a function:
void draw()In this case, “draw” is the name of the function. “void” just needs to be there, as do the parenthesis. We’ll come back to these a bit later, so just ignore them for now. The next part of the function is the opening curly brace:
{You’ll notice that there’s also a closing curly brace a bit later:
}Everything in between these curly braces is called a block. A block is where you can give the computer as many instructions as you want. Each instruction is called a statement. This collection of statements inside the block is what defines the body of a function. Everything that you want to happen as a part of a function should be inside the function's curly braces. Let’s look at some of the statements inside the example draw function:
	// set the background color
	// background( grey value 0-255 );
	background( 255 );

	// draw a circle
	// ellipse( center-x, center-y, width, height );
	ellipse( 150, 150, 100, 100 );
Notice all the // characters - whenever you see this, it means that everything else on the line is a comment, and can be ignored. Comments are good to have, because they are like little bits of documentation, or instruction - notes to yourself or anyone else that might be helpful in understanding what the code does. Without the comments, there are two statements in the function, the first is:
background( 255 );This simply erases the background of the canvas with a specific color - in this case white. The next statement is:
ellipse( 150, 150, 100, 100 );This one draws a circle in the middle of the canvas. There are a few things that these statements have in common.
- They both instruct the computer to do something by issuing a command (
background,ellipse). These are built-in functions, that are a part of Processing. - They each clarify their command by providing a little extra information (
(255),(150, 150, 100, 100)). These are called parameters. Every function will have a set of parameters it is looking for. The above call to background only takes a single parameter - a value from 0 to 255 which represents a shade of gray from black to white. The call to ellipse uses four parameters - two for the x and y coordinates of the center of the ellipse, and one each for its width and height. - They each end with a semi-colon. Every statement must end with a semi-colon. It’s more of that funny syntax, but it’s actually really important, because otherwise the computer wouldn’t know where your statement ends - imagine trying to read a paragraph that had no periods.
Pixels
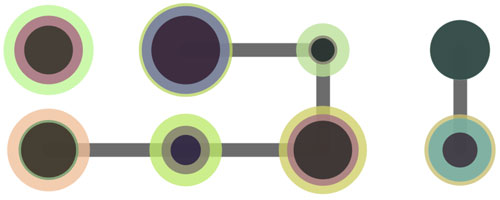
If you have done any graphing in school, you will likely have seen a graph that looks something like this:

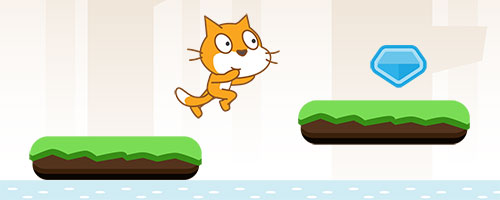
This is a standard way of plotting points in math & science: 0,0 is in the middle; x values increase from left to right; and y values increase from bottom to top (these are called cartesian coordinates, but you don’t need to remember that). If you have ever used Scratch (http://scratch.mit.edu), this may look familiar:
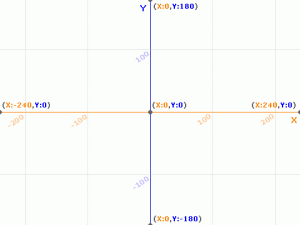
This is the standard Scratch stage, where you can position your sprites. As in the above standard graph, 0, 0 is in the middle; x values increase from left to right; and y values increase from bottom to top. In Processing (and most computer graphics), things are a little different. 0, 0 is in the top left corner, instead of being in the middle of your canvas. Additionally, y values increase from top to bottom. Fortunately, x values still increase from left to right:
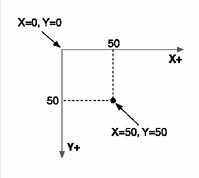
When drawing in Processing, we are drawing individual pixels. When you create a canvas that’s 300 x 300, you are creating a grid of 300 x 300 pixels - 90,000 (300 times 300) little squares that you can fill in with any color you like. For example, the text you are reading right now is composed of little tiny pixels, and if you could zoom in, you would see the pixels:

Color
The first thing you’ll want to do, before you draw anything, is to set your background color. To do this, you’ll use the background() command. There are two versions of this command. The first version erases using a grayscale value - which is just a fancy way of saying a shade of gray - from black to white:
background( gray ); // gray is 0-255 (black-white)This will erase the background using black:
background( 0 );This will erase the background to white:
background( 255 );The second version erases the background using different amounts of red green and blue:
background( red, green, blue ); // red, green and blue are each 0-255You can use the Color Selector in the Tools menu to visually choose colors. Anywhere that you can enter a color, you can use either the single grayscale value, or the three values for red, green, and blue.
Things you can draw
There are many built in shapes and things that you can draw. You can draw circles and ellipses using the ellipse() command (for a circle, width and height should be the same number of pixels):
ellipse( center-x, center-y, width, height );Draw a rectangle:
rect( left-x, top-y, width, height );Draw an arbitrary quadrilateral (4-sided shape):
quad( x1, y1, x2, y2, x3, y3, x4, y4 );Draw a triangle:
triangle( x1, y1, x2, y2, x3, y3 );Draw a line:
line( x1, y1, x2, y2 );Draw a single point:
point( x, y );Change the fill color for all shapes that follow:
fill( gray ); // gray is 0-255 (black-white)
fill( red, green, blue ); // red green and blue are 0-255
noFill();
Change the line/stroke color for all shapes that follow:
stroke( gray );
stroke( red, green, blue );
noStroke();
Change the line/stroke thickness for all shapes that follow:
strokeWeight( thicknessInPixels );Full reference of functions in Processing: http://processing.org/reference/
Try it yourself!
Here are some ideas for you to try on your own:
- Fill the canvas with as many circles/rectangles/triangles as you can. Leave no whitespace untouched.
- Draw a stop light.
- Use the circle command to draw circles with different widths and heights. See if you can make an eye shape
- Draw concentric circles with different colors.
- Draw some overlapping rectangles such that every rectangle overlaps another one, but also isn’t completely contained by one.
Start with this sketch to make things a little easier for yourself! You can work right in Sketchpad, or just copy and paste the code below into the Processing app.
// setup function
//	This is where you set things up before you sketch runs
//	e.g. tell processing how big you would like your canvas to be
//
void setup()
{
	// set the canvas size
	size( 300, 300 );
}

// draw function
//	this is where you will do all your drawing
//	don't forget the semi-colons after each command
//	all your drawing should be done inside the curly braces
void draw()
{
	// set the background color
	// use a gray value from 0-255, (0 is black, 255 is white)
	// or, use three values from 0-255 - one each for red, green and blue
	// like this:
	//	background( 255, 80, 35 );
	background( 255 );

	// draw a circle
	// ellipse( center-x, center-y, width, height );
	ellipse( 150, 150, 100, 100 );
}